First, understand that an epoxy floor IS NOT a painted floor.
Epoxy is a thermosetting resin that is applied as a coating. It is formed when you mix one part epoxide resin with one part polyimide hardener. The hardener acts as a catalyst and is what gives epoxy its strength. The epoxy floor install process is a race against time.
Unlike paint, which has to dry, epoxy must cure. Mixing the two parts starts the chemical reaction, which in turn, starts the exothermic curing process.This curing process produces tightly cross-linked polymer structures, giving the epoxy its superior strength and durability. The outcome is a coating that is much thicker than paint and one that binds stubbornly to a carefully prepared surface.
We will turn your garage into a showpiece.
Our proven process will turn your garage floor into the envy of the neighborhood, typically in just one day.
We typically arrive promptly at 8am or 9am, your choice. Some people like to sleep in, we get it. Your floor needs to be clear of all items so we can begin our work promptly!
Our Epoxy Floor Install Process
Goes Something Like This:
1. Blow Out the Dust.
We will blow the dust, leaves, and whatever else we may find, out of your garage. We apply tape to all walls and trim. Because, it is far better to not get epoxy on things than it is to clean it off.
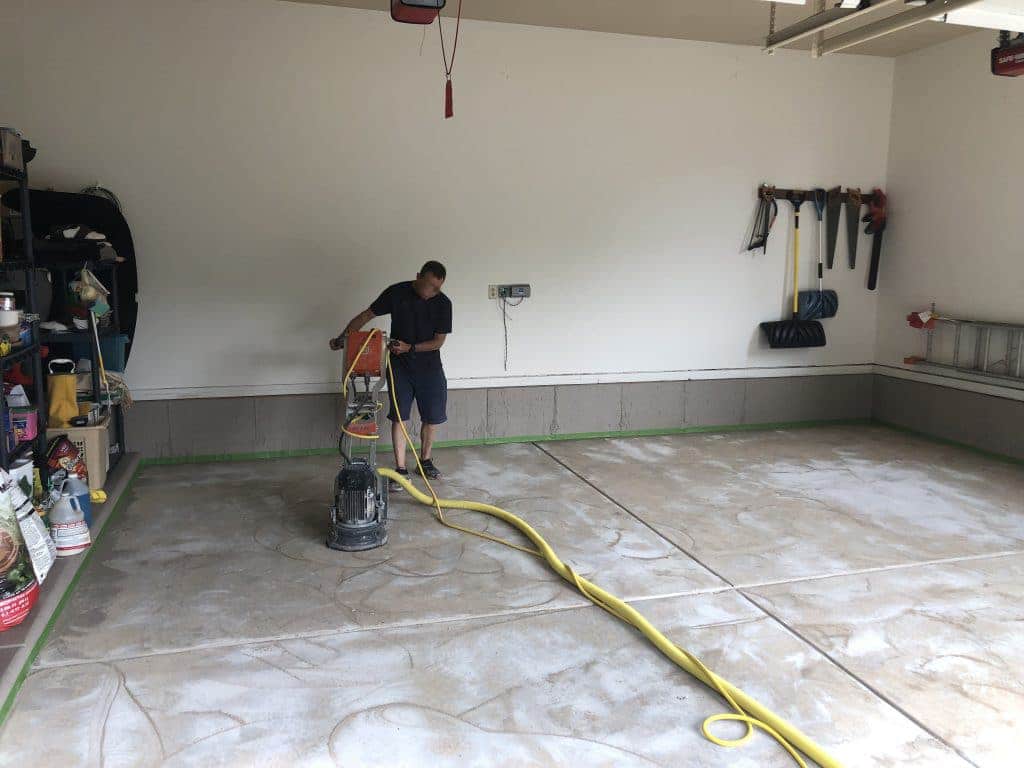
2. Grind the Profile Into the Concrete Surface.
The products we use are penetrators and do not merely sit of the surface. A surface application can chip, blister or peel and so we must prepare to allow absorption into the concrete. Our grinders create a profile with diamond grinding heads. In layman’s terms, we are basically opening the surface pores, which allows the coatings to wick deeply into the concrete, creating a permanent, mechanical bond.
Why don’t we acid etch? Check out why grinding the concrete is superior to acid etching.
3. Clean the Concrete, Again.
We vacuum the floor and pick up the concrete dust.
We connect an industrial grade vacuum with a HEPA filter to our grinder, which keeps dust down to a minimum.
4. Inspection and Repair.
Crack and/or concrete are “fixed” (as needed): If needed, cracks are opened up and areas in need of repairs are filled with an engineered grout and are then made smooth.
5. Clean the Concrete, Yes, Again.
We vacuum your floor in to pick up all the concrete dust. Don’t worry, we are going to take it with us.
6. Epoxy Base Coat Application.
Imperative to the longevity of your floor coating, the use of a tinted deep penetrating epoxy ensures just what the name implies… deep product penetration and a permanent bond. The epoxy base coat is tinted to coordinate with the predominant color found in the blend of paint flakes chosen.
7. Let the Flakes Fly!
This is a FULL broadcasting of torginol flakes (which do not dissolve in solvent). Depending upon the color formula you select, we average broadcasting 50 pounds of flakes for every 450 square feet of flooring installed and strive for a 95% coverage rate of the tinted epoxy base coat. Did we mention you can get just about any color you want?
8. After the Flake We Wait.
The floor cures in typically 1 to 4 hours depending on the temperature and any accelerants we might use. Best practices are to leave it to cure overnight but if your floor is smaller, we may stay on site in order to finish in one day. It is very important to keep pets, humans, and debris off of the floor.
9. Remove the Excess Flake. Off The Floor, of Course.
Once cured, the excess flakes are removed and the floor is vacuumed… again.
10. The Build Coat
If you purchased a build coat, it goes on now. A build coat adds thickness to your floor (2mm to 5mm) and give it a deeper luster and shine. We really recommend this coat. It will make a huge difference.
11. The Topcoat
Within one hour of laying the build coat the topcoat is installed.
We apply a top coat of a UV stable polyurea topcoat in order to seal the vinyl flakes, protect the floor from spills, automotive fluids, and harsh chemicals like ice melting salts and fertilize. The topcoat also provides a beautiful, gloss surface to the finished floor. The top coat prevents UV yellowing of the floor and provides for an easy to clean surface.
You can walk on the floor 4 hours after we finish the top coat(s). In 24 hours, you can move your items back onto the floor. After 48 hours has passed, you can drive on your new floor.
And then the magic …
The finished floor will have a gentle shine, but will provide some grip, due to the vinyl flakes leaving a texture in the surface of the floor. Urethane top coatings may be used for commercial epoxy flooring, for heavy loads like forklift traffic on the epoxy. Either way, your epoxy floor will create a beautiful, functional space that will surely add to the value of your home.
Click the button below to choose
your date and time!